How to burn CDs and DVDs in Windows Vista
Sun, 02/03/2008 - 14:55 — Ciprian
![]() In this tutorial I will show you how to burn your files on a CD or DVD, using only Windows Vista's built-in tools. In order to write a CD or DVD you must have an optical disc drive capable of burning such storage media. If you double click on the Computer icon from your desktop, these drives are listed as CD RW Drive or DVD RW Drive. If you have an appropriate drive, then you need blank CDs or DVDs on which to burn your files. If you have those as well, just follow these instructions:
In this tutorial I will show you how to burn your files on a CD or DVD, using only Windows Vista's built-in tools. In order to write a CD or DVD you must have an optical disc drive capable of burning such storage media. If you double click on the Computer icon from your desktop, these drives are listed as CD RW Drive or DVD RW Drive. If you have an appropriate drive, then you need blank CDs or DVDs on which to burn your files. If you have those as well, just follow these instructions:
First, take a blank CD or DVD and insert it into your CD RW or DVD RW optical disc drive.

After a few seconds the AutoPlay menu should pop-up. Depending on your configuration, you will have several options available. Click on 'Burn files to disc using Windows'.

If the AutoPlay menu does not show up, you can right click on the drive containing the writable CD or DVD and then select Open AutoPlay.

The 'Burn a Disc' wizard will now start. Type the disc title and click on the 'Show formatting options' arrow.

Now you can choose the format of your disc. If you choose Live File System, you can copy files to the disc at any time, instead of burning them all at once. This option is recommended if you want to burn files that occupy less space than the disc capacity. This way, you can add other files at a later time until you fill all the available space on your CD or DVD.
If you choose Mastered, you won't be able to add files to the disc at a later time, even though there is some free space left. Also, discs created using this format are more likely to be compatible with older computers and operating systems.

Once you have decided on the format click on Next. A new window will appear, asking you to drag files to this folder to add them to the disc.

Open another Computer window or Windows Explorer and go to the location of the files you want to burn. Select them and, with the left mouse button pressed, drag them to the previous window.
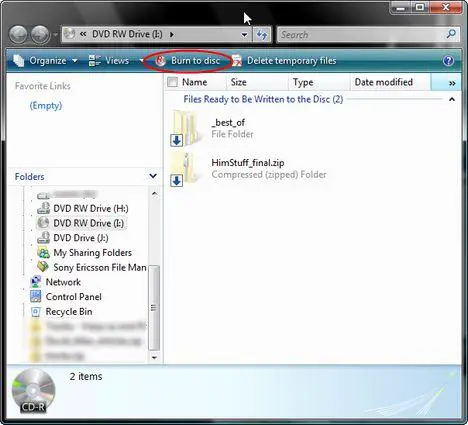
After you have dragged all the files you want to burn, click on the Burn to disc button.
Choose the recording speed and check the option that says 'Close the wizard after the files have been written'. If you want to, you can also change the disc title. When finished, click on Next.

The burning process will now start. Wait until the progress bar reaches its end and the CD or DVD is ejected from the optical disc drive unit. Depending on your system and the amount of files burned, the burning process can take from a few seconds up to several minutes.

Related articles:
How to burn a Video DVD using Windows DVD Maker
How to burn an Audio CD
Recommended articles:
Burning Questions: Instant Reference Guide to Creating DVDs and CDs

This work is licensed under a Creative Commons Attribution-Noncommercial 3.0 License.
Microsoft, Windows and the Windows logo are either registered trademarks or trademarks of Microsoft Corporation in the United States and/or other countries. Microsoft Corporation in no way endorses or is affiliated with www.vista4beginners.com.
All other products mentioned are registered trademarks and/or trademarks of their respective companies.
Comments
Vista built in CD/DVD Burner
This program is very unreliable and takes for ever just to burn a 512mb data disc,which usually does not complete or crashes. Third party software does the job reliable and fast,like Nero.
Hi
I have a question, how do I do for windows movie maker if i want to sen my movie to a dvd?
First, U can save movie
First, U can save movie whatever u can make it.. just save it an appropiate file format on desktop and then u can burn this file on optical disk drive.. If you have any question then it will be mention on the internet..
if you can't go for internet then i will show you how to write movie on dvd drive..first take a blank DVD into DVD drive then you can see a option tht choose a file format option...(it seems look like a bullet button..) then choose live CD files..and click next..if you want to format on your disk then click next and go ahead..thenafter the other windows brower will be open in next stage and it will ask your dreag and drop file where u can save your data..just go to this location and paste it on DVD disk then click on URN to disk button..nd enjoy ur Movie in DVD...
Can you tell me tht it's a corret process whuch u want...
thx and enjoy ur weekends
Do not understand Live vs Mastered
I actually understand live to a point. I know that is similar to copying files to any disc. But I thought Mastered also should be used if you are looking to make a disc playable to most regualr DVD players.
Also unclear on DVD creator. Can it be installed on Windows Vista Bus. Ed. or just Ultimate & Premium?
i burnt a 2.34 gb in 10 minz
i burnt a 2.34 gb in 10 minz soo it quite fast
burning issues
My PC keeps rebooting when trying to burn either CD or DVD. Tried using Vista burning process and Nero 8, but the same thing happens ruining the blank disc in the process. Any help out there please?
burning issues
i use this program to burn about fifty cd-r's and dvd-r's. when i realized some of my folders were on the disk but the files on the inside weren't inside them. then I looked closer at the other folders 1 to 15 files were missing.. I tried running the burner at slower speeds and that did nothing to help in some cases made it worse. anyone have any suggestion how to fix it.
I think it would help you
I think it would help you guys to check a disc mojo review it's specially recommendable for beginners or even running a business. Having an automated assistant makes this feature attractive.
Burning Issues
When i try burning files on to a blank DVD+RW, i follow the process' up to when the DVD window appears, however i am not able to drag and drop files and folders on to the DVD. Please Help!!
problem
I tried this but it doesn't work. sometimes it asks me to format the disk before i burn something to it... then when i drag and drop, it works and the computer says burn completed sucessfully. but when I try to play the cd in a computer, car , stereo etc it tells me that the disc is blank or sometimes it says 'undisk'
can anyone help?
Post new comment