How to use the Check Disk tool
Tue, 01/22/2008 - 20:18 — Ciprian
![]() One of our readers asked us to create a tutorial about the Check Disk tool in Windows Vista. Even though nothing has changed about this tool since Windows XP, we decided to create such a tutorial and make sure all our readers understand what this tool does and how to use it.
One of our readers asked us to create a tutorial about the Check Disk tool in Windows Vista. Even though nothing has changed about this tool since Windows XP, we decided to create such a tutorial and make sure all our readers understand what this tool does and how to use it.
Basically, Check Disk is a tool that verifies your disks for file system integrity, locates bad sectors and recovers readable information. This can be very helpful when you have some form of hardware failure which affects the integrity of your files. Unless you have some serious hardware problems, Check Disk can help you recover corrupted information from your hard disk, floppy disk or memory stick.
How to find Check Disk
Unfortunately there is no direct shortcut for Check Disk. First, you need to either double click on the Computer shortcut or to start Windows Explorer. Then select the partition you want to check, right click on it and select Properties.

In the Properties menu go to the Tools tab. There you will have access to three sections: error-checking, defragmentation and backup. Go to Error-checking and click on the Check Now button. If UAC (User Account Control) is enabled, you will have to confirm that you want to start the Check Disk tool.

How to use Check Disk
The Check Disk window is very simple. Check both options, click on the Start button and the error-checking process will start.

If the disk you want to check is used by an application or by the operating system, you will receive a warning saying that the disk cannot be checked while it's in use. In this case, click on Schedule disk check.

When you will restart your PC, the selected disk will be checked for errors and repaired, if needed. After the restart you will see a black screen like the one in the screenshot below. Do not press any keys and wait for the Check Disk tool to finish it's job.

Using Check Disk from the Command Prompt
You can also use the Check Disk tool directly from the Command Prompt. Search for the word 'command' in the Start Menu search box, right click on the Command Prompt shortcut and select the option that says Run as administrator.

To find the complete list of command line parameters, type 'chkdsk /?' and then press Enter.
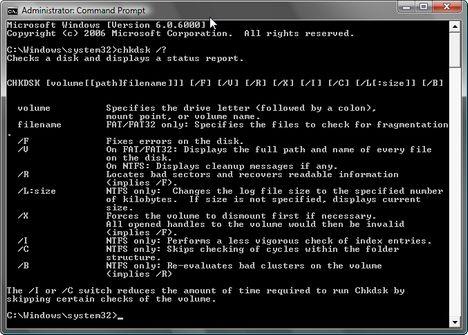
For most cases it is enough to use 'chkdsk C: /F' or 'chkdsk C: /R'.
'C:' is the driver letter of the disk that will be checked for errors. Instead of 'C:', you can type any drive letter. By using '/F' you will make sure that the Check Disk tool will fix the errors found on the disk. When using '/R', Check Disk will locate bad sectors and recover readable information. Using this parameter implies the use of '/F' so there is no need to use them both.
Related articles:
Disk Defragmenter
Defragment your hard drive from the Command Prompt
Disk Cleanup

This work is licensed under a Creative Commons Attribution-Noncommercial 3.0 License.
Microsoft, Windows and the Windows logo are either registered trademarks or trademarks of Microsoft Corporation in the United States and/or other countries. Microsoft Corporation in no way endorses or is affiliated with www.vista4beginners.com.
All other products mentioned are registered trademarks and/or trademarks of their respective companies.
Comments
Excellent Tutorial!
That's just the info I was looking for! Thanks :)
Excellent info. After
Excellent info. After reading this article anyone can easily use this tool in Windows Vista for checking their disks for Bad sectors etc.
WTF???/
WTF? it cant fix it says:windows cant read master file .. windows will try to fix....windows cant fix and then aborts something and nothing HAPPENs WTF TO DO PLZ HELP ME????????
Hi.. I have one question
Hi..
I have one question concerning the command line parameters. when i typed in chkdsk /R it displays
"The type of the file system is NTFS
cannot lock current drive
chkdsk cannot run because the volume is in use by another process."
so can anybody help me with this since i am not a computer whiz i dont know what this thing means..thanks a lot for the help
Check Disk
At the end of that message it will ask you: "Would you like to force a dismount of this volume? (Y/N)".
Type "y" and the press on Enter.
If Windows Vista cannot dismount the volume, it will ask you: "Would you like to schedule this volume to be checked the next time the system restarts? (Y/N)". Type "y", press Enter and reboot your PC.
Before logging in, Check Disk will check that partition and reboot your PC if necessary.
Check Disk
My computer automatically goes into Check disk mode each time I start up my computer. It never used to do this. How can I disable this so that it does not automatically begin at start up?
How to use the Check Disk tool
Good work,
Keep going...
Check Disk
I have already gone through all these steps and have resorted to looking on the internet for an answer when I came across the same steps that I have already taken. My problem is that when I get to the error "Windows can't check disk while it's in use," and then I click on the Schedule disk check and restart my computer, nothing happens. It doesn't go to the black screen showing it's searching for any errors. This is becomming very frustrating. Any ideas?
check disk
Did you ever get a fix for this?
Check disk is not running after startup
Hi,
I am running into the same problem. I tried running chkdisk from both command prompt and after a restart.. the restart happens, but no checkdisk and from the command prompt, I am getting "chkdisk is not recognized as and internal or external command..."
It's awfully frustrating to say the least.
Post new comment